 EUR
EUR GBP
GBP JPY
JPY CNY
CNY SAR
SAR SGD
SGD NZD
NZD ARS
ARS INR
INR COP
COP AED
AED
4.How to Access camera via CMS on PC (Window)?
How to Access camera via CMS on PC (Window)?
Step A: download and install the software named “CMS” in CD; also get it from us.


Step B: After finishing the installation, the software login automatically, see following:

Step C: Choose “Setting”, during the same segment network, it automatically search and show device(see following)

Step D: Select “Quick Setup” to add device, as shown as below:


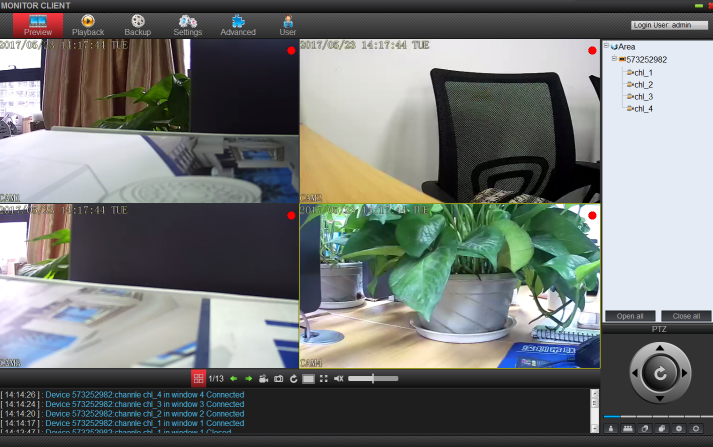
Step E: Click “Preview”, then click “Open all”, videos will be show, see folowing

10.3 Access via CMS on PC (MAC)
Step A: Get the software “EseeCloud” from APP Store or get from us and Install it on PC, see following

Step B: Open the software, as shown as following:

Note: you should get a message to allow this software, please click “Allow”.
Step C: Click “Device Manage”, Choose “add cloud ID”, Type “Cloud ID” and select” note”, Then click “add”, see following.


Step D: Click”preview”, then click “all connect”, then videos are shown, as following:

Step A: download and install the software named “CMS” in CD; also get it from us.


Step B: After finishing the installation, the software login automatically, see following:

Step C: Choose “Setting”, during the same segment network, it automatically search and show device(see following)

Step D: Select “Quick Setup” to add device, as shown as below:


Step E: Click “Preview”, then click “Open all”, videos will be show, see folowing


10.3 Access via CMS on PC (MAC)
Step A: Get the software “EseeCloud” from APP Store or get from us and Install it on PC, see following

Step B: Open the software, as shown as following:

Note: you should get a message to allow this software, please click “Allow”.
Step C: Click “Device Manage”, Choose “add cloud ID”, Type “Cloud ID” and select” note”, Then click “add”, see following.


Step D: Click”preview”, then click “all connect”, then videos are shown, as following:
